We built a thing that figures out where your old photos were taken
We built a desktop app that sends your photos to AI vision models, gets back location data, and writes GPS coordinates into the actual files.
Everyone has that folder. Hundreds of photos from old trips, phone backups, random downloads. They’re all named IMG_4523.jpg or DSC_0091.CR2. No GPS data, no location, nothing useful in the metadata. You vaguely remember that one photo was from Prague, but which one? No idea.
Google Photos tries to solve this, but you have to upload everything to Google’s servers. Apple Photos does something similar if you’re in their ecosystem. Both keep the data locked in their platforms. We wanted something different: an app that looks at your photos, figures out where they were taken, and writes that information back into the files themselves. When you’re done, the GPS coordinates are in the EXIF data, the files have useful names, and you don’t need any particular app to read them.
Who actually uses this
People sitting on years of unorganized photos who keep saying “I’ll sort these eventually.” Photographers who shoot in RAW and don’t have GPS on their camera body. Real estate agents with property photos that need location data. eBay sellers who photograph products on location and want the GPS baked in. Anyone who’s ever opened a folder of photos and thought “where was this?”
Also, people who don’t want to upload their entire photo library to a cloud service just to get location tags. The photos get sent to an AI provider for analysis (Google, OpenAI, or Anthropic), but they’re not stored anywhere. Your files stay on your machine. The results stay in a local database.
The tech stack
The app is Electron with React and TypeScript on the frontend, styled with Tailwind CSS v4. Data lives in a local SQLite database through better-sqlite3. We use exiftool-vendored to write GPS and other metadata into image files, and exifr to read whatever EXIF data already exists. The AI calls go through the official SDKs for Google Gemini, OpenAI, and Anthropic. Build system is electron-vite for development and electron-builder for packaging installers.
Nothing exotic. We picked boring, well-maintained tools on purpose. Electron gets criticism for memory usage, but for a desktop photo tool that people run occasionally, it’s fine. It let us ship for Windows, macOS, and Linux from one codebase without any platform-specific code.
The hardest part: GPS coordinate parsing
Not even close to anything else.
Here’s the problem: you ask three different AI models “where was this photo taken?” and you get three completely different response shapes. Gemini might give you {lat: 33.49, lng: -111.93}. OpenAI might nest it under {gps_coordinates: {latitude: "33.49 N"}}. Some models return a comma-separated string like "33.49, -111.93". Others use DMS format like "33°29'N". A few wrap everything in an array for no reason.
We ended up writing a normalizer that tries direct fields first (lat, latitude, lat_degrees), then checks for nested objects under four different key names, then tries parsing comma-separated strings, then handles DMS notation. It’s about 50 lines of defensive code that exists purely because AI models can’t agree on a response format. Even when you tell them exactly what you want.
The best bug was the falsy-zero problem. We had Number(val) || null to convert values. Works great, except when the latitude is 0 (which is the equator). Number(0) is 0, which is falsy in JavaScript, so 0 || null gives you null. We were silently dropping every GPS coordinate on the equator. Took us longer to find than we’d like to admit.
// Before (broken):
const lat = Number(val) || null  // 0 becomes null

// After:
function toNum(v: unknown): number | null {
  const n = Number(v)
  return isNaN(n) ? null : n
}
We didn’t catch it for a while because none of our test photos were from the equator. Found it when we added a test case for edge values and 0 came back null.
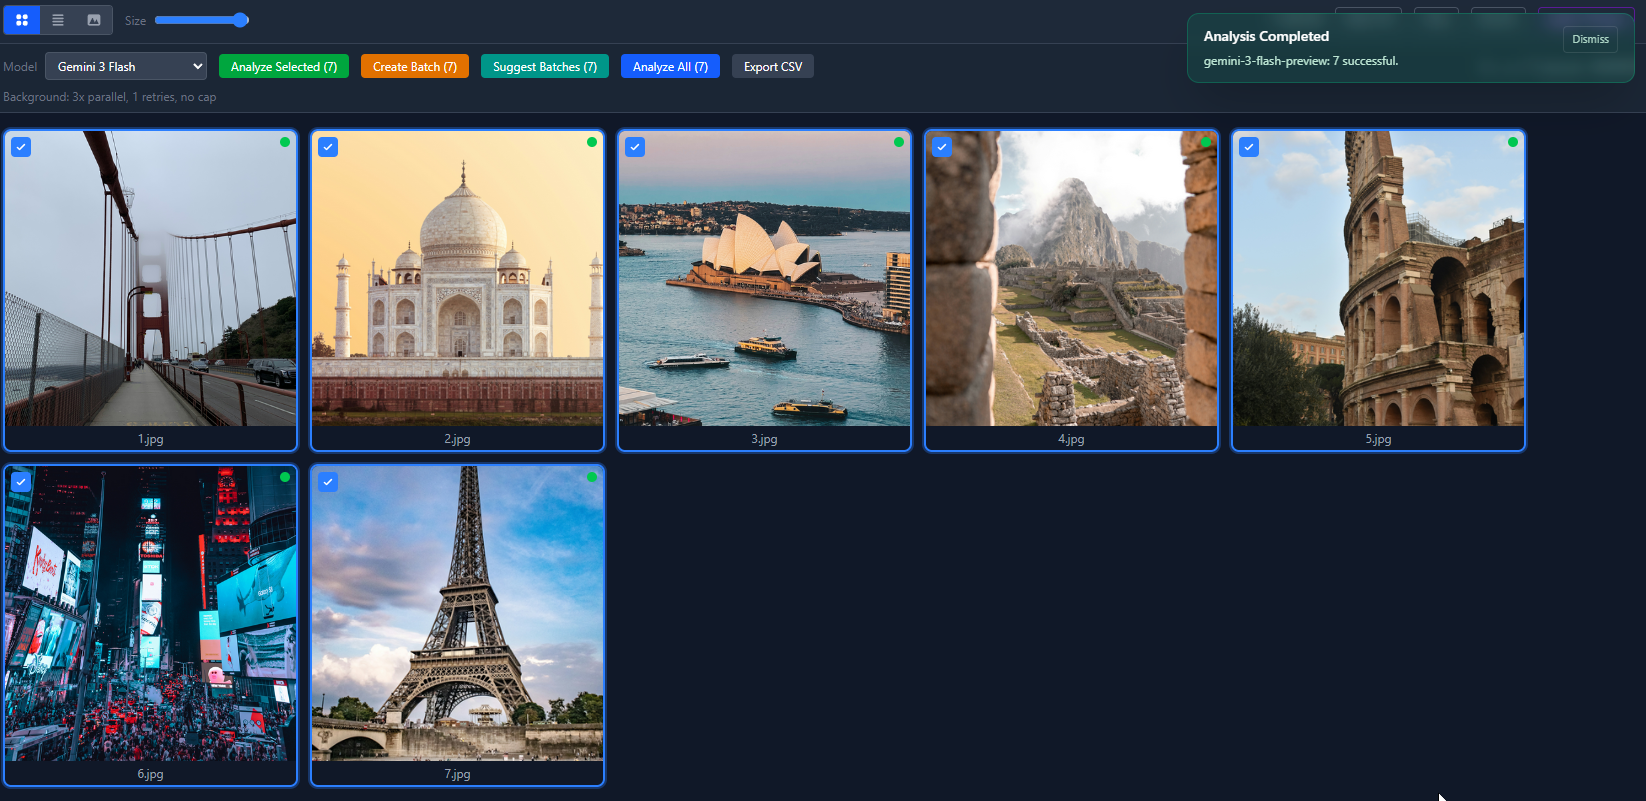
Here’s what 7 analyzed photos look like in the grid view. Green dots mean the AI identified the location. Red dots mean low confidence.
How the data flows
The architecture is straightforward:
- User opens a folder. We scan it for image files and create a “batch” in SQLite, with one row per image.
- User clicks Analyze. For each image, we read the file, base64 encode it, and send it to whatever AI provider they picked. The prompt asks for location, city, state, country, GPS coordinates, time estimate, and a confidence level.
- The AI response comes back as JSON (usually). We run it through our normalizer to handle all the format variations, validate it against a Zod schema, and store the result in the database. If the model returns garbage, Zod catches it and the task gets marked as failed.
- User reviews the results. They can approve, reject, or edit each one. The app shows original EXIF data next to the AI results so they can compare.
- User clicks Apply Changes. We copy each original file to an output folder, use exiftool-vendored to write GPS coordinates into the copy, and rename it based on a template. Originals are never modified.
The analysis runs through a queue system that handles concurrency (multiple images analyzed at the same time), retries on failure, pause/resume, and cost caps. Everything is tracked in SQLite. If the app crashes mid-batch, it picks up where it left off.
Electron’s process model adds some complexity. The AI calls and file I/O happen in the main process. The UI runs in the renderer process. Communication between them goes through IPC handlers. We have about 40 IPC endpoints, which is a lot, but each one does one thing.
What it can actually do
Multi-provider AI analysis
The app works with 16+ models across Google Gemini, OpenAI, and Anthropic. Each provider has its own SDK integration with structured output support (Gemini uses responseSchema, OpenAI uses zodResponseFormat, Anthropic uses output_format). When a response comes back, it goes through a normalizer that maps whatever field names the model used (location_name, locationName, specific_location, place) to our standard format. The rest of the app never knows which model produced the result.
Here’s the list view after running all 7 photos through Gemini 3 Flash. Every one came back high confidence, total cost under a penny.
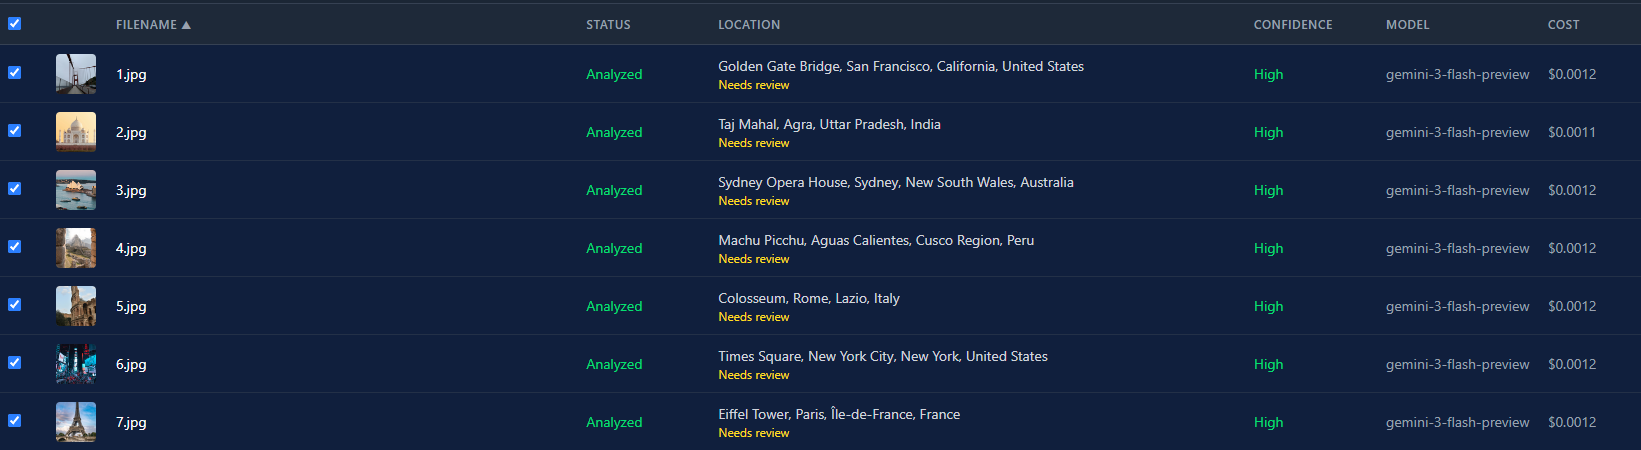
The cost difference between models is massive. Gemini 3 Flash runs about $0.0004 per image. GPT-5 is around $0.02. That’s a 50x difference. For a batch of 500 photos, that’s $0.20 vs. $10. The model picker isn’t just a preference thing. It’s a real budget decision.
GPS writing for pretty much every image format
We started with piexifjs for writing EXIF data, but it only handles JPEG. That was fine until we tested with actual photo libraries. People have PNGs from screenshots, HEICs from iPhones, TIFFs from scanners, and RAW files from cameras. So we switched to exiftool-vendored, which wraps Phil Harvey’s ExifTool. It writes GPS to JPEG, PNG, TIFF, WebP, HEIC, HEIF, AVIF, and a bunch of RAW formats (DNG, CR2, CR3, NEF, ARW, ORF, RW2).
The app always writes to a copy, never the original. It creates an output folder, copies each file there, then writes GPS data into the copy. If you also have renaming turned on, the copy gets the new name. One output file per image with everything applied.
Error classification that saves time
When an API call fails, we look at the error and sort it into one of four buckets: auth (bad or expired API key), rate-limit (too many requests), network (connection failed, timeout, DNS issues), or unknown. This matters because auth errors should never be retried. If your API key is wrong, retrying 3 times just wastes 30 seconds. Rate-limit and network errors get retried because they’re usually temporary.
export function classifyApiError(error: unknown): ErrorCategory {
  const msg = (error instanceof Error ? error.message : String(error))
    .toLowerCase()
  const status = (error as { status?: number })?.status ??
    (error as { statusCode?: number })?.statusCode

  if (status === 401 || status === 403 ||
      msg.includes('api key') || msg.includes('unauthorized')) {
    return 'auth'
  }

  if (status === 429 || msg.includes('rate limit') ||
      msg.includes('quota')) {
    return 'rate-limit'
  }

  if (msg.includes('econnrefused') || msg.includes('fetch failed') ||
      msg.includes('etimedout') || msg.includes('socket hang up')) {
    return 'network'
  }

  return 'unknown'
}

// In the queue, the classification controls retry behavior:
const shouldRetry =
  category !== 'auth' &&
  !currentRun.cancelRequested &&
  !this.isRunCostExceeded(run) &&
  task.attemptCount <= run.retryLimit
It’s pattern matching, not science. But it catches the common cases and prevents the most frustrating failure mode: watching the app retry a bad API key over and over.
Batch processing that doesn’t lose your work
You can throw 500 photos at the app and walk away. It processes them with multiple concurrent workers (configurable, default 3), tracks progress in SQLite, and reports real-time cost using actual token counts from the API responses. Not estimates. If you set a cost cap of $2.00, the app stops analyzing once it hits that limit and marks remaining images as skipped.
The queue system is crash-safe. Every task state change goes to the database before anything else happens. If Electron crashes, the power goes out, or you force-quit the app, the next launch detects interrupted runs and picks up where they stopped. You won’t lose 200 completed analyses because the app crashed on image 201.
You can also pause mid-batch. Useful if you realize you picked the wrong model or need to check early results before continuing. And if the first pass comes back with low confidence on some images, you can configure auto-upgrade: the app re-runs just those images with a more expensive model.
Side-by-side EXIF comparison
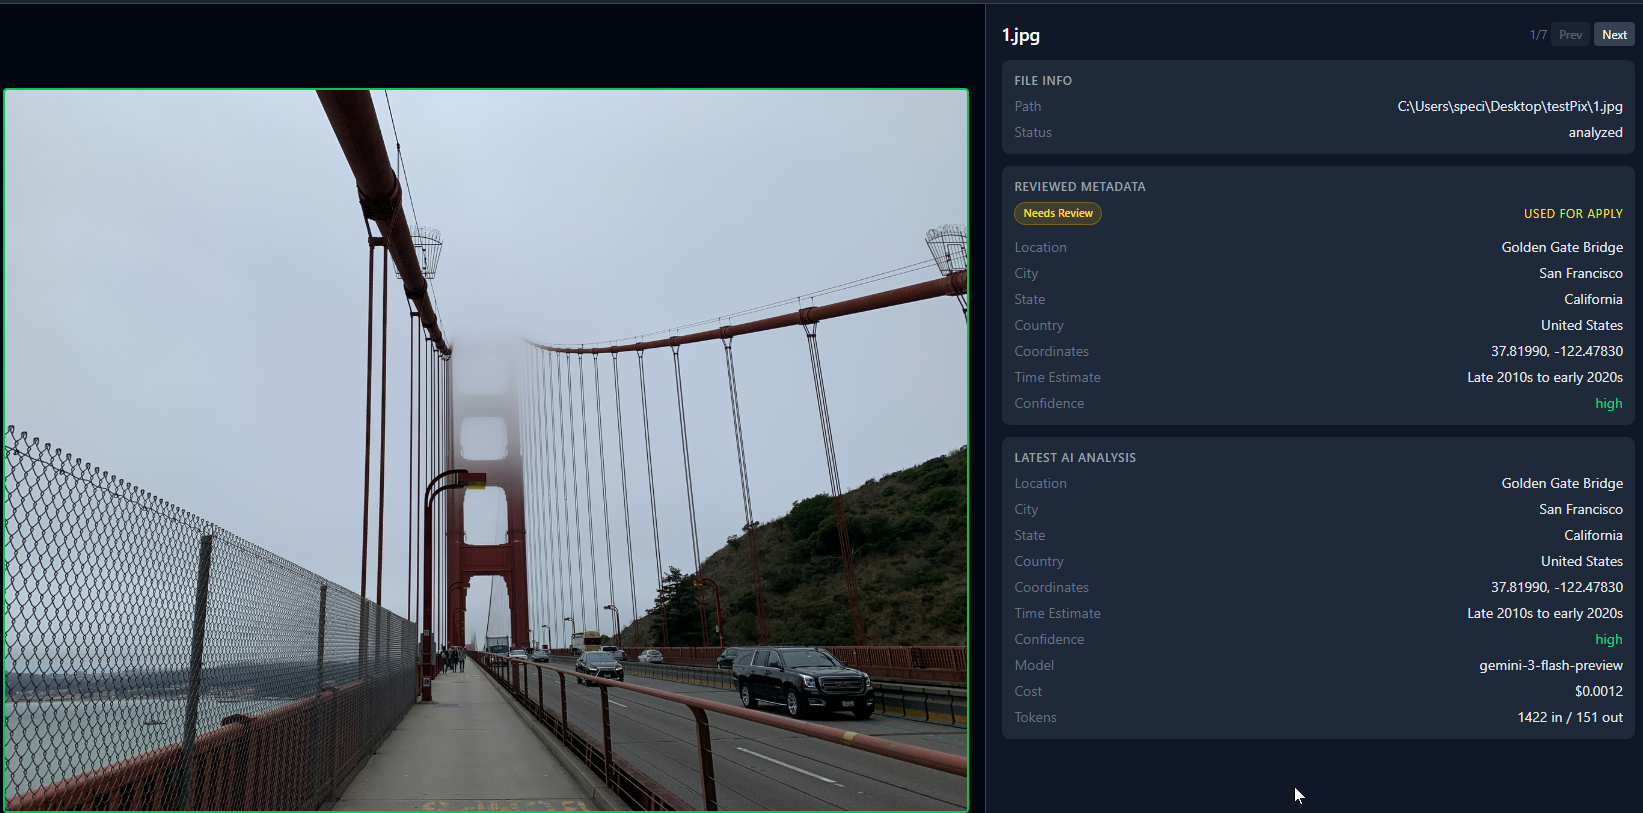
The detail view pulls original EXIF data from the file using exifr (camera model, date taken, dimensions, and any existing GPS) and shows it next to the AI analysis results. This is useful in two ways. First, if the photo already had GPS embedded, you can see whether the AI agrees with it. If the coordinates are way off, that’s a red flag. Second, the camera model and date help you verify the AI’s time estimate. If the EXIF says “Canon EOS R5, March 2023” and the AI says “estimated 2015-2018,” something’s wrong.
Trade-offs we made
The big one: BYOK (bring your own API key). Users have to go to Google AI Studio or OpenAI’s dashboard, create an API key, and paste it into our settings. That’s real friction. Non-technical users won’t do it.
But the alternative was running our own API proxy. That means building a backend, setting up billing, dealing with usage metering, handling abuse, and paying for servers. For a side project we weren’t sure anyone would use, that’s a lot of infrastructure. BYOK means the app is completely standalone. We ship a binary, users run it, we maintain nothing.
We also decided against local AI models. Gemma 4, LLaVA, and similar models can do basic image understanding, but when we tested them for location identification, the results were vague. “This looks like a beach” isn’t helpful when you need “Waikiki Beach, Honolulu, Hawaii.” Cloud models are genuinely better at this because they’ve seen more of the internet. The hardware requirements for running a decent vision model locally would exclude most of the people who’d actually want this app.
The third trade-off was supporting three AI providers from day one instead of just one. That tripled the API integration work. Honestly, 90% of users will just use Gemini because it’s the cheapest. But having options matters if you already have an OpenAI key and don’t want to sign up for another service.
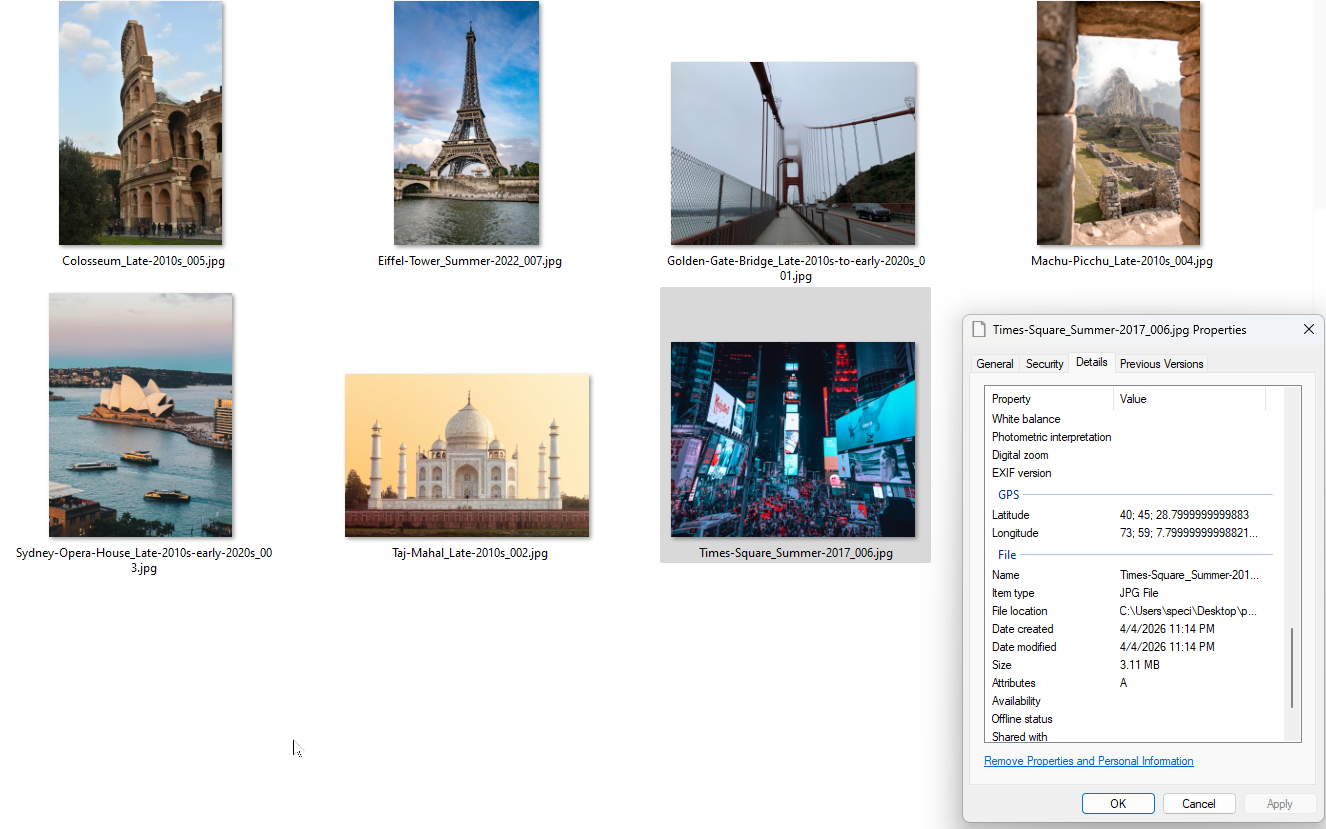
And here’s the output. Renamed files with GPS coordinates baked into the EXIF data. You can verify it in Windows file properties.
What we’d do differently
We’d ship with Gemini only and add other providers based on demand. Three integrations was three times the work, three times the edge cases, three times the testing.
We’d also spend less time going back and forth on pricing. We debated free vs. paid vs. freemium vs. open source for way too long. That time would have been better spent on the actual product. In the end we went open source. It took about 30 seconds to make that decision stick once we stopped overthinking it.
On the technical side, we’d think harder about the database schema upfront. We added columns and migrations several times as new features came in (like the state field for locations, which we didn’t have initially). Starting with a slightly more flexible schema would have saved a few rounds of ALTER TABLE.